Dynamic Stamps
Dynamic stamps let you overlay real-time project data — like the current date, project number, and your name — directly onto your professional stamp image. Instead of applying a static image and manually filling in details with our annotations, Part3 automatically populates the fields when you apply the stamp.
📹 Check out our help video to walk you through dynamic stamps!
Creating a Dynamic Stamp
Step 1 — Upload Your Base Image
- Go to Account Settings (click your initials in the top right corner, then Account Settings).
- Scroll to the Stamps section.
- Click "+ New dynamic stamp"
- Upload your base stamp image (PNG or JPEG).
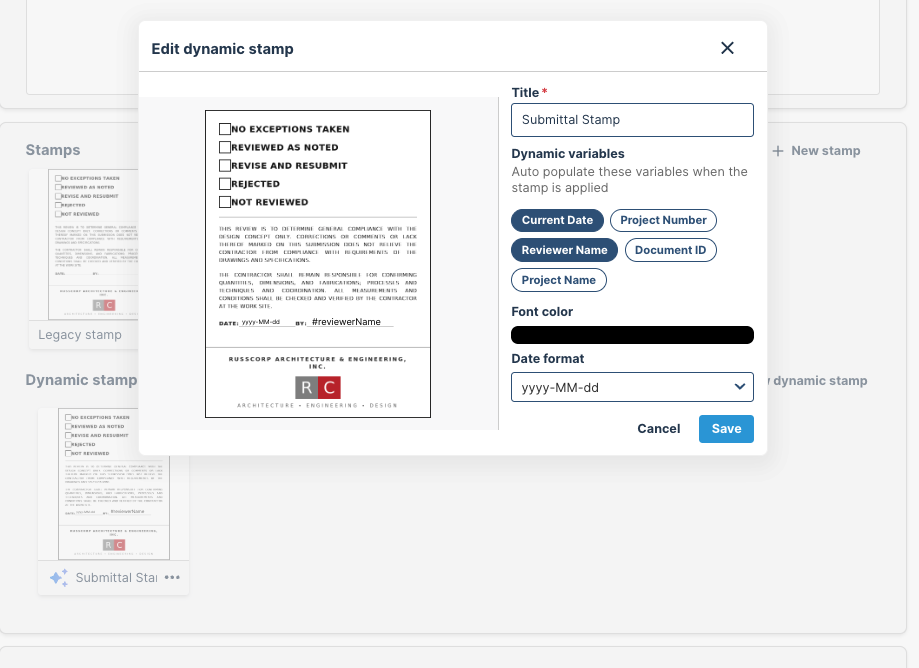
Step 2 — Add Dynamic Fields
- Add a stamp title
- Add dynamic variables: In the editor sidebar, click the pill buttons for each field you want to include (Current Date, Project Number, Reviewer Name, etc.). Each field appears as a draggable text element on top of your stamp image.
Step 3 — Position and Size the Fields
- Click and drag each field to place it exactly where you want it on your stamp. You can adjust the font size for each element. Positions and fonts are stored as percentages, so your layout scales correctly at any size.
Step 4 — Configure Appearance
- Click the colour swatch to open the font colour picker and set the text colour (default is black). If you added a Current Date field, select your preferred date format from the dropdown.
Step 5 — Save
-
Enter a title for your stamp and click "Save". Your new dynamic stamp will appear in your stamps list with a sparkle icon to distinguish it from static stamps.

Applying a Dynamic Stamp to a Document
To apply your dynamic stamp to a document, like a submittal, follow these steps:
- Open the document to review. Once in review mode, select the stamp icon to apply your stamp.
- In the stamp selector, choose your dynamic stamp (look for the sparkle icon).
- The Apply Stamp modal will open with two panels:
- Left panel: A live preview showing your stamp populated with real project data
- Right panel: Controls to fine tune element positions and sizes.
- Optionally, click Mark stamp status to add an X mark to the stamp. The button will turn green with a checkmark when active, and you can position the X anywhere on the stamp.
- Click Apply Stamp to finalize. Your stamp is rendered with all fields filled in and placed on the document.

Editing a Dynamic Stamp
- Go to Account Settings > Stamps.
- Click on your existing dynamic stamp card.
- The editor reopens with all your current settings — reposition elements, adjust sizes, change the font colour, update the date format, or rename the title.
- Click "Save" to update.
Important: You cannot change the base image of an existing dynamic stamp. If you need a different image, delete the stamp and create a new one.
Deleting a Dynamic Stamp
- Go to Account Settings > Stamps.
- Click the three-dot menu on the dynamic stamp card.
- Select "Delete stamp."
- Confirm by clicking "Yes, delete" in the dialog.
As always, if you have any questions or see any issues with this article, please reach out to by emailing support@part3.io