
Allowlisting Part3
What is Allowlisting?
This is the process of adding an email to an approved sender list, so emails from that sender are never moved to the spam folder. Instead, when a recipient allowlists an email address, they are confirming that they know and trust the sender.
Why Allowlist Part3?
This is important to make sure your internal and external team members receive emails via Part3. The Part3 emails are sent to users based on their email settings in their account. The emails are sent when there are actions on the project or they are included on the distribution list.
We do not want those emails to go to a Junk Folder and not be read.
Gmail: How to Allowlist Part3?
If your account is managed by a company admin (IT Manager), they can add team@part3.io to the safe list. Read more here this article.
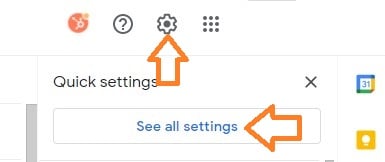
Step 1: Click the gear icon in Gmail and select "See all settings" from the Quick Settings menu.
Step 2: Navigate to "Filters and Blocked Addresses" in the top menu.
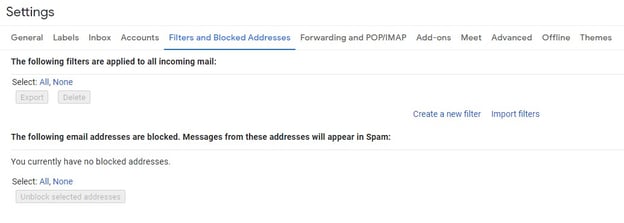
Step 3: Select "Create a new filter."
In Gmail, allowlisting an email involves creating a filter.

Step 4: Add a specific email or a whole domain in the "From" field.
The "From" field is where you'll specify what's getting allowlisted. In Gmail, you can specify either a specific email address (e.g. team@part3.io), or you can allowlist a whole domain by omitting everything before the at symbol (e.g. @part3.io).
The former will allow one specific email address while the latter will allow anyone who is sending emails from that domain.

Step 5: Click "Create filter."
From there, you don't need to input any additional information. Simply click the Create filter button at the bottom of the window (next to the blue Search button).
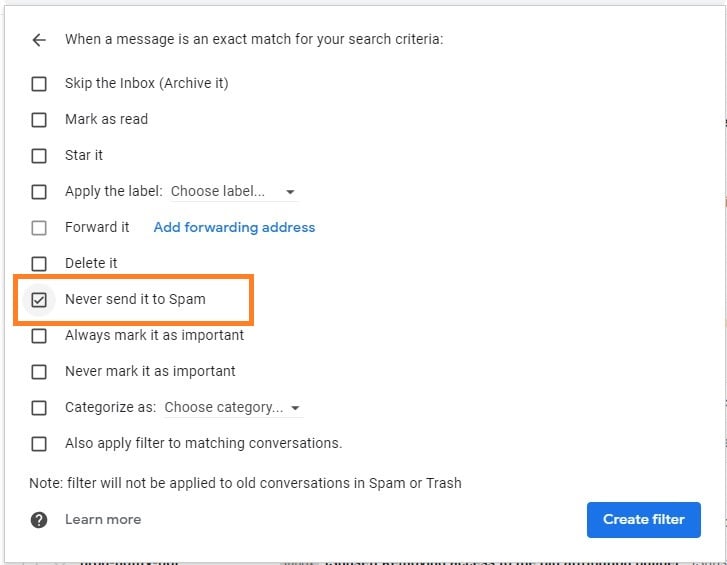
Step 6: Check "Never send it to Spam" in the checkbox.
Clicking the button brings up a new window. Here's where you'll actually specify that what you're doing is allowlisting. In Gmail, you do this by checking the Never send it to spam box.
Doing so will ensure that emails that meet the criteria you specified never end up in Spam or Trash (unless you do so manually).
Step 7: Click the blue "Create filter."
Once this information is specified, you click the "Create filter" button again, and this creates the allowlist within Gmail.
Outlook: How to Whitelist Part3?
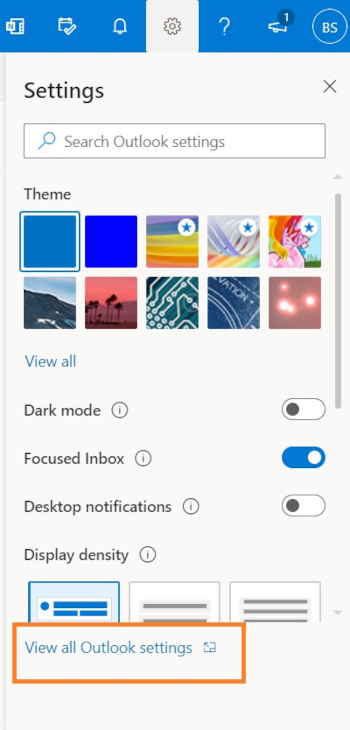
Step 1: Click the gear icon in Outlook and select "View all Outlook settings."
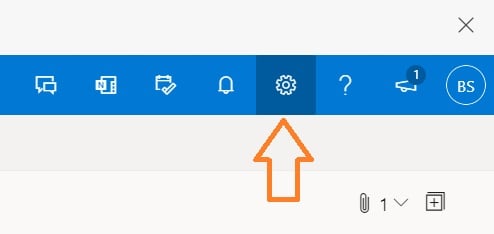
When you select it, a drop-down menu will appear. At the bottom of the drop-down menu, you'll choose View all Outlook settings.
Step 2: Select "Mail" from the settings menu.
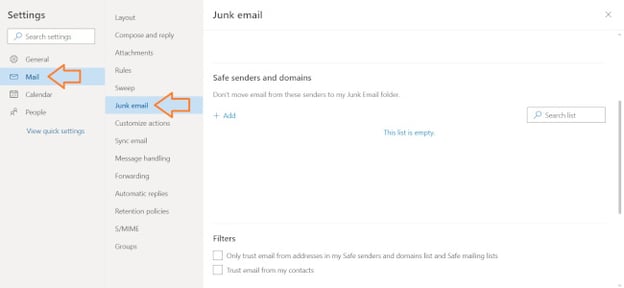
Step 3: Choose "Junk email" from the submenu.
Step 4: Click "Add" under "Safe senders and domains."
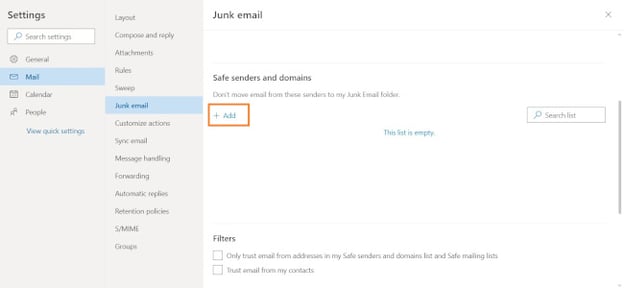
Step 5:. Enter the team@part3.io or part3.io email address that you want allowlisted.
Step 6: Choose "Save."
As always, if you have any questions or see an issue with this document, please contact us at support@part3.io