Document Sealing Requirements in Part3
This guide walks you through how to upload sealed documents to Part3 while maintaining their encryption 🚀! This ensures your documents remain secure and compliant based on your practice requirements.
By following these steps, you’ll be able to fully leverage Part3’s features—like document creation and issuance—while also meeting provincial requirements for sealing documents.
Watch: Video Walkthrough
Step 1: Enable Digital Sealing in your Settings
To get started, you must enable digital sealing in your project settings.
- Go to Settings > Advanced Settings >Toggle on 'Enable Digital Sealing'

✅ This setup only needs to be completed once on your project, but can be updated at any time.
Tip:
If while following the below steps you run into the error 'no custom template found' please contact our support team for assistance. The digital sealing feature requires a custom organization-level template, which our support team can apply for you.
✅ How To Seal & Issue Documents (PC, SI, CD, CO)
The below instructions applies to a Proposed Change (PC) workflow. The concept is the same for the following documents as well. While the UI will look a little different, the steps are the same.
- Proposed Changes (PC)
- Supplemental Instruction (SI)
- Change Directive (CD)
- Change Order (CO)
Steps to Create:
- Navigate to your PC document. (If you haven't created a PC yet, follow this help guide to learn how!)
- Attach your document to the PC, by selecting the + next to the blue 'seal' button.

- Now finalize your document by adding all other standard information.
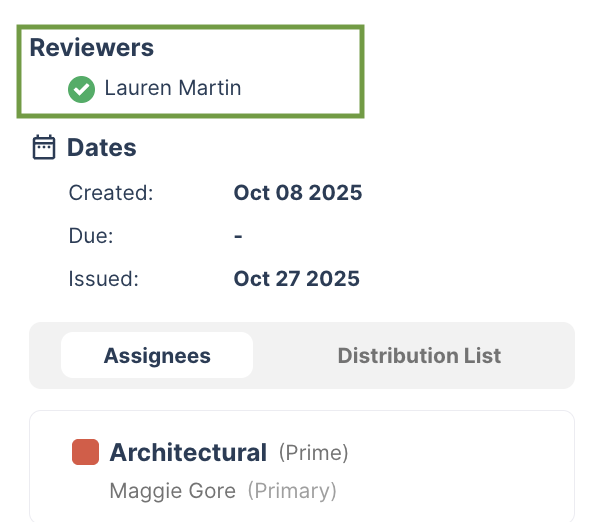
- If needed, add reviewers to the document.
- Ensure each reviewer signs the document before moving on to the next step.
- Once a reviewer has completed their review, a green checkmark ✅ will appear next to their name, confirming it’s been signed off. Their signature will also appear on the document next to their name.
- Once you're ready to issue, it's time to export the cover page from Part3, in order to seal it externally, and upload again.
- Download the cover page: Do this by clicking the blue 'seal' button, followed by 'Download Document Name' . You'll notice a pop-up that shows what date the cover page was downloaded.
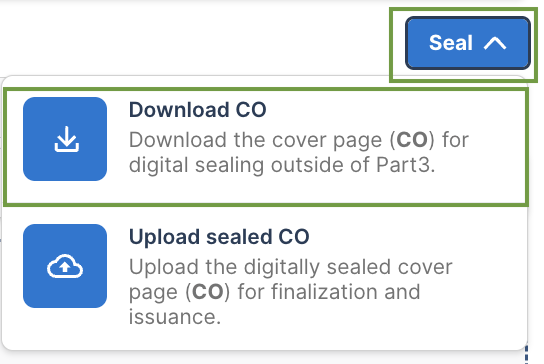

- Seal the downloaded cover page outside of Part3!
- Upload the sealed document: Do this by selecting 'seal' and 'upload sealed PC".
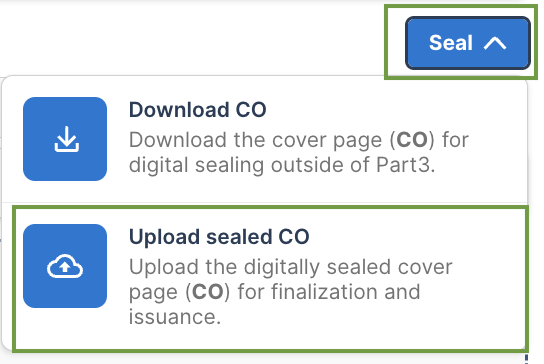
- Now your sealed cover page is attached to your PC! You'll see that the PC has been 'digitally sealed' with the blue pill next to the document name (see below).

- Issue the document as usual by selecting 'issue' in the top right of the document.
- Download the document: by selecting 'download' in the top right of the document. This will provide you with a zipped folder of the issued document(s)! 🎊
⚠️ Tip: Because we're only exporting prime's cover page, this means you won't be sealing any other disciplines cover page. Consultants have the ability to seal their cover page by selecting 'seal' next to their discipline within the PC document!
📋 How To Seal & Issue Certificates
The below instructions apply specifically to certificate workflows. Once a certificate has been created, the entire document must be exported from Part3 and then sealed externally. This is a bit different from the above document types—where only the cover pages are sealed outside of Part3. For certificates, sealing the full document package is required to meet compliance standards.
- Navigate to your certificate. (If you haven't created a certificate yet, follow this help guide to learn how!)
- Once you're ready to issue, it's time to export the certificate from Part3 by downloading, in order to seal it externally, and upload again.
- Download the document: Do this by clicking the blue 'seal' button, followed by 'download' to download the document for digital sealing outside of Part3.
- Seal the downloaded document outside of Part3!
- Upload the sealed document: Do this by selecting 'seal' and 'upload sealed document'.
- Now your sealed document is included in Part3! You'll see that the document has been 'digitally sealed' with the blue pill next to the document name (see below).

- Issue the document as usual by selecting 'issue' in the top right of the PC.
- Download the document: by selecting 'download' in the top right of the document. This will provide you with a zipped folder of the issued document(s)! 🎊
📋 How To Seal & Issue Field Reports
The below instructions apply specifically to field reports workflows. Once a certificate has been created, the entire document must be exported from Part3 and then sealed externally (this is the same process as the above certificates flow).
- Navigate to your field report. (If you haven't created a certificate yet, follow this help guide to learn how!)
- Once you're ready to issue, it's time to export the report from Part3 by downloading, in order to seal it externally, and upload again.
- Download the document: Do this by clicking the blue 'seal' button, followed by 'generate and download report' to download the document for digital sealing outside of Part3.
- Seal the downloaded document outside of Part3! Be sure to also add the issue date, as this is not automatically populated.
- Upload the sealed document: Do this by selecting 'seal' and 'upload report'.
- Now your sealed document is included in Part3! You'll see that the document has been 'digitally sealed' with the blue pill next to the document name (see below).

- Issue the document as usual by selecting 'distribute report' in the top right of the document.
- Download the document: by selecting 'download' in the top right of the document. This will provide you with a zipped folder of the issued document(s)! 🎊
As always, if you have any questions or see any issues with this article, please reach out to by emailing support@part3.io